ESP8266 - Everything SPIFFS or what? Or also: An own file system on our microcontroller
Hello and welcome to my new blog. In a previous post we already talked briefly about SPIFFS. Today we want to take a closer look at what SPIFFS actually is, what possibilities it offers us and how we can use it with our all-rounder microcontroller ESP 8266. First of all what does SPIFFS actually mean? SPIFFS stands for (S)erial (P)eripheral (I)nterface (F)lash (F)ile (S)ystem and it means that our ESP can hold a simple file system in the SPI program memory, which also contains our program code. In this file system files can be created, modified or deleted. These files can be used or changed by our program code during runtime, or they can have been created by us before. We will come back to how this is done later. The biggest advantage, however, is that this memory area, once created, is preserved during code updates! I.e. an updated program can continue to work with the data which were stored as file on this directly under reference to the file name.
Setup
To be able to work with a file system, it must first be initialized on our ESP with a defined size. This size depends on the used ESP module (maximum size) as well as on our configuration.
By default the ESP-01 modules have 512 KB flash up to 1 MB flash. The ESP-12, ESP-12E and ESP-12F modules (also known as NodeMcu module) have at least 4 MB Flash up to 8 MB Flash. From this total flash we now reserve a memory area for our file system using the Arduino IDE:
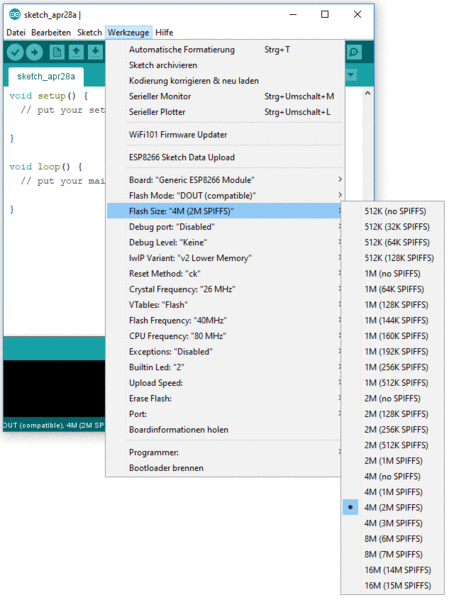
Before we upload a sketch, we select the size of our future file system. In the above example, I chose a 2 MB size for my ESP8266-12. Now we can use the following code to format our file system for first use. This step is mandatory when creating a new file system or reconfiguring the SPIFFS size:
#include <SPI.h>
#include <FS.h>           // Include the SPIFFS library

boolean InitalizeFileSystem() {
  bool initok = false;
  initok = SPIFFS.begin();
  if (!(initok)) // Format SPIFS, of not formatted. - Try 1
  {
    Serial.println("SPIFFS Dateisystem formatiert.");
    SPIFFS.format();
    initok = SPIFFS.begin();
  }
  if (!(initok)) // Format SPIFS. - Try 2
  {
    SPIFFS.format();
    initok = SPIFFS.begin();
  }
  if (initok) { Serial.println("SPIFFS ist  OK"); } else { Serial.println("SPIFFS ist nicht OK"); }
  return initok;
}

void setup() {
    SPI.begin();                      // Initialisiere SPI Kommunikation
    bool Result  = InitalizeFileSystem();

}

void loop() {


}
After compiling and uploading, our file system is ready for use. We can create, modify and delete files. The files are opened with so-called "modes", which specify the desired access mode. Thereby stands
- W - for write (writing or creating a new file)
- R - for read (reading a file)
- A - for append (adding data to the end of a file)
Use:
Within the file, a data pointer is used to indicate the current read/write position within a file. To show a practical example and at the same time use as many commands around file operations as possible, in the following example we create a file and write a new entry every 5 seconds. The next time the controller is reset, we delete the file and start over. The file content is output sequentially on the serial interface. Finally the current file size in bytes. +
#include <SPI.h>
#include <FS.h>           // Nutze die SPIFFS library

File myfile;                   // erstelle ein SPIFFS Handling Variable

boolean InitalizeFileSystem()
{
  bool initok = false;
  initok = SPIFFS.begin();
  if (!(initok)) // Format SPIFS, of not formatted. - Try 1
  {
    Serial.println("Format SPIFFS");
    SPIFFS.format();
    initok = SPIFFS.begin();
  }
  if (!(initok)) // Format SPIFS, of not formatted. - Try 2
  {
    SPIFFS.format();
    initok = SPIFFS.begin();
  }
  if (initok) { Serial.println("SPIFFS ist OK"); } else { Serial.println("SPIFFS ist nicht OK"); }
  return initok;
}

void setup()
{
  Serial.begin(9600);
  SPI.begin();
  bool Result  = InitalizeFileSystem();
  if (!(SPIFFS.exists ("/usage_log.csv") ))  //Prüfe ob Datei usage_log.csvschon exisiert.
  {
    myfile = SPIFFS.open("/usage_log.csv", "w");  //Öffne die Datei usage_log.csv im Root Verzeichnis zum schreiben (w – write)
    if (!myfile)
      {
      Serial.println("Fehler beim schreiben der Datei");
      }
    Result = myfile.println("01.01.1980  12:00:00;Log cleared or deleted");
    Result = myfile.println("01.01.1980  12:00:01;First Entry, second Line");
    myfile.close();
  } else
  {
   SPIFFS.remove("/usage_log.csv");  //Lösche Datei
   Serial.println("Datei usage_log.csv exisierte schon ! Sie wurde gelöscht.");
  }
}

void loop()
{
  myfile = SPIFFS.open("/usage_log.csv", "r");  //Öffne die Datei usage_log.csv im Root Verzeichnis zum lesen (r - read)
  String content=myfile.readStringUntil('\n');
  Serial.println("Methode: readStringUntil:");
  while (myfile.position()<myfile.size())            // lese Dateiinhbalt Zeile für Zeile bis um Ende der Datei
        {
          content =myfile.readStringUntil('\n');
          Serial.println(content);
        }
  int FileSize = myfile.size();
  myfile.close();
  Serial.print("Dateigroesse in Bytes:");           // gebe die aktuelle Dateigröße in Bytes aus
  Serial.println(FileSize);                                     // gebe die aktuelle Dateigröße in Bytes aus
  delay (5000);
  yield();               // interne ESP8266 Funktionen aufrufen
  myfile = SPIFFS.open("/usage_log.csv", "a");  // Öffne Datei um Daten anzuhängen ! (a - append)
  myfile.println("01.01.1980  12:00:xx;Zeile wurde hinzugefügt.");
  myfile.close();
}
We copy the code into our DIE and upload the sketch to our ESP.
The ESP starts adding entries to the internal file "usage_log.csv". We should get an output like this:

The most important commands are
SPIFFS.open("/filename", "r"); // Read a file
SPIFFS.open("/filename", "w"); // Write or create a new file
SPIFFS.open("/filename", "a"); // add data to the end of a file
For a complete reference of possible commands related to SPIFFS and file handling, see the following link:
http://arduino.esp8266.com/Arduino/versions/2.0.0/doc/filesystem.html#file-system-object-spiffs
Spiffs plugin
The ESP Arduino IDE Plugin is an Arduino IDE plugin that uploads files from the "data" subfolder of a sketch to an existing SPIFFS file system. This is done by deleting the existing SPIFFS files IM ESP, and replacing them with the files from the "data" folder. We do this by downloading the zip file from https://github.com/esp8266/arduino-esp8266fs-plugin and unzipping it to a location of our choice. The now unpacked "esp8266fs.jar" we put now under the following folder structure, which we created before: My Documents->Documents->Arduino->Tools->ESP8266FS->Tool. After a restart, new subitem will be created under Tools -> ESP8266 Sketch Data Upload":

Have fun experimenting & until the next post!


3 comments
georg
hallo,
ich habe mit interesse Ihre erklärungen zum SPIFFS system gelesen, es wäre übertrieben wenn ich behaupten würde alles verstanden zu haben…
diesen code habe ich mir nach einem beispiel hier für meine bedürfnisse angepasst, er funktioniert auch:
-———————————
//board: ESP8266 Boards /node mcu 1.0
#include
#include // Nutze die SPIFFS library
int FileSize_frequency;
String sliderValue_frequency = “4”;
String sliderValue_frequency_alt;
File myfile_frequency; // erstelle eine SPIFFS Handling Variable
void setup()
bool Result_frequency = InitalizeFileSystem(); if (!(SPIFFS.exists (“/frequency_config.csv”) )) //Prüfe ob Datei frequency_config.csv schon exisiert. { myfile_frequency = SPIFFS.open(“/frequency_config.csv”, “w”); //Öffne die Datei frequency_config.csv im Root Verzeichnis zum schreiben (w – write) if (!myfile_frequency) { Serial.println(“Fehler beim schreiben der Datei”); } Result_frequency = myfile_frequency.println(“sliderValue_frequency”); Result_frequency = myfile_frequency.println(sliderValue_frequency); myfile_frequency.close(); } else { SPIFFS.remove(“/frequency_config.csv”); //Lösche Datei Serial.println(“Datei frequency_config.csv war schon vorhanden, sie wurde gelöscht.”); }{
Serial.begin(115200);
SPI.begin();
}
void loop()
while (myfile_frequency.position() < myfile_frequency.size()) // lese Dateiinhalt Zeile für Zeile bis um Ende der Datei { String content = myfile_frequency.readStringUntil(‘\n’); Serial.println(content); } FileSize_frequency = myfile_frequency.size(); myfile_frequency.close(); Serial.print(“Dateigroesse in Bytes:”); // gebe die aktuelle Dateigröße in Bytes aus Serial.println(FileSize_frequency); // gebe die aktuelle Dateigröße in Bytes aus delay (5000); yield(); // interne ESP8266 Funktionen aufrufen if (sliderValue_frequency != sliderValue_frequency_alt) //die config_frequency soll nur einmal bei sich änderndem “sliderValue_frequency” geändert werden { myfile_frequency = SPIFFS.open(“/frequency_config.csv”, “a”); // Öffne Datei um Daten anzuhängen ! (a – append) //myfile_frequency.println(“sliderValue_frequency”); myfile_frequency.println(sliderValue_frequency); myfile_frequency.close(); sliderValue_frequency_alt = sliderValue_frequency; }{
myfile_frequency = SPIFFS.open(“/frequency_config.csv”, “r”); //Öffne die Datei usage_log.csv im Root Verzeichnis zum lesen (r – read)
}boolean InitalizeFileSystem()
{
bool initok = false;
initok = SPIFFS.begin();
if (!(initok)) // Format SPIFS, if not formatted. – Try 1
{
Serial.println(“Format SPIFFS”);
SPIFFS.format();
initok = SPIFFS.begin();
}
if (!(initok)) // Format SPIFS, if not formatted. – Try 2
{
SPIFFS.format();
initok = SPIFFS.begin();
}
if (initok)
{
Serial.println(“SPIFFS ist OK”);
}
else
{
Serial.println(“SPIFFS ist nicht OK”);
}
return initok;
}
-———————————————
nun muss ich zwei variable in zwei dateien ins SPIFFS schreiben: frequency und power. Die beiden sketsche funktionieren einzeln sehr gut. Der versuch, die beiden sketche in eines zu integrieren scheitern mit einer Exception 9. Ich habe alle stellen, wo es mir notwendig schien entsprechend geändert und wie gesgt – einzeln funktionieren die sketche. Könnten Sie mir bitte einen tipp geben, woran das liegen könnte? Ich würde vermuten es liegt an diesen beiden zeilen:
-—————————-
bool Result_power = InitalizeFileSystem();
bool Result_frequency = InitalizeFileSystem();
-———————————-
ich kann ein system nicht 2x initialiseren, ohne dass was durcheinander gerät, denke ich…
vielen dank
gruss georg
Andre
Hallo,
in der neusten Arduino IDE funktiniert SPIFFS nicht mehr, es wird im Moment auch nicht weiterentwickelt und soll zuküntig aus dem ESP2866 core entfernt werden. LittleFS dient als Ersatz und ich konnte es mit der neusten Arduino IDE verwenden. Unter folgendem Link findet ihr weitere Infos.
https://arduino-esp8266.readthedocs.io/en/latest/filesystem.html
Viele Grüße,
André
Stumpfbrumme
Danke das war hilfreich!